Friday, June 9, 2017

Android SDK on Ubuntu 12 04 Precise Pangolin

Android SDK on Ubuntu 12 04 Precise Pangolin


In my previous blogs, I showed how to install various flavours of Java on Ubuntu 12.04 - both 32 and 64 bits versions. Now I will show how to install and configure the Google Android SDK to be used together with Java for Android software development.

  1. First head over to:

      http://developer.android.com/sdk/index.html

    and download the latest (as of December 2012) file:

      android-sdk_r21-linux.tgz

    IMPORTANT NOTE:
    If you are using the 64-bit version of Ubuntu 12.04, you MUST download and install the ia32-libs package since the Android SDK is a 32-bit application and requires the 32 bit library to operate properly. To download and install, open a terminal and execute:
      sudo apt-get install ia32-libs

  2. Open a terminal and unzip the downloaded file:

      tar xvf ~/Downloads/android-sdk_r21-linux.tgz

    This will create a new directory android-sdk-linux in your home directory containing all the unzipped files. Why the home directory? The simple answer is to avoid file permission problems. Note that by installing the SDK in the home directory, only the current user can access it - so security is guaranteed.

    If, however, you want the SDK to be accessed by other users, then you may have to install it somewhere else - perhaps the /opt directory. This article will not describe how to do that - it just assumes that the current user is the only one that can access the SDK.

  3. Change directory and execute the android SDK:

      cd android-sdk-linux/tools
      ./android


    NOTE:
    You can set the PATH environment to point to your Android SDK tools directory so that you can start the android program anywhere. Edit the .bashrc file in your home directory and add the following lines to the end of the file:

    # set PATH so it includes users Android SDK if it exists
    if [ -d "$HOME/android-sdk-linux" ] ; then
      PATH="$HOME/android-sdk-linux:$HOME/android-sdk-linux/tools:$PATH"
    fi

    This will only take effect on the next logout/login or restart.

    The SDK Manager will start as shown in the screen-shot below.

    Initial SDK Manager screen

    Notice the progress bar at the bottom of the screen - this indicates that the SDK Manager is querying for updates from Google. Wait until this is finished and the Done loading packages message appears. Notice that the Android SDK Tools have already been installed. According to Google, the Android SDK Platform-tools is also required when you install the SDK for the first time - so the first thing you need to do to place a check mark on that item. Then click on the Install 1 package button (see figure below).

    Android SDK Platform-tools selected

    A window will pop-up asking you to confirm - click on the Accept radio button and then the Install button.
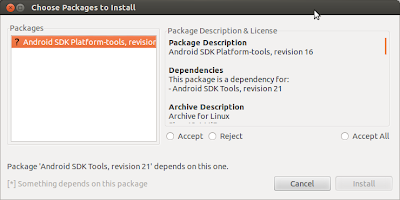
    Confirmation screen

    Accept and install

    The platform-tools package will then be downloaded and installed. A log screen (as shown below) may appear if there are problems during install - ignore the Stopping ADB server failed (code -1) message if it appears on the log - this seems to be harmless. Close the log window by clicking on the Close button.

    Log window

    The screen will now look like the one shown in the screen-shot below.

    Final SDK Manager screen

  4. You will now have to select at least one set of packages for Android application development. For this article, the Android 4.2 (API 17) package is selected by placing a check mark on this package. Then click on the right-pointing arrow to the left of this item to expand it. You can now inspect the list of packages that will be downloaded and installed. The final screen will look like the one shown below.

    Select packages

    Click on the Install 6 packages button - a window will pop up listing all the packages to be installed. Since multiple items have been selected, click on the Accept all radio button - then press the Install button to start the process of downloading and installing the packages. The progress bar at the bottom indicates the status of this process. Also a log screen may appear if there are problems during install - fix the problem and try again if so. The final screen should show that all the packages have been successfully installed as shown.

    Selected packages installed

    Thats it - you have installed the latest Android packages necessary for software development. As of December 2012 this is Android 4.2 (API 17) - codenamed Jelly Bean. Is it necessary to install all the other packages (API 3 to 16)? That is entirely up to you - if you really need to develop software only for a specific Android version, then, by all means download and install it using the SDK Manager.

  5. Now we need to set up at least one AVD (Android Virtual Device) on which you can test your developed software. The AVD is an emulator which emulates the ARM processor. To set up the AVD we need to invoke the AVD Manager which is part of the SDK Manager. Click on Tools (in the menu bar) and then click on the Manage AVDs... item. You will see the screen as shown below.

    Android Virtual Device Manager screen

  6. Click on the New button - a new window will pop-up (see below).


    AVD Manager selections

    Give the new AVD a name - for example MyJellyBean.

    Under Device select a suitable device - in the example, I have selected 7.0" WSVGA (Tablet) (1024 x 600: mdpi).

    Under Target, select Android 4.2 - API Level 17.

    Leave the Keyboard: and Skin: selected.

    Under Front Camera:, you can select None (default) or Emulated. If you have a webcam on your PC, this can also be used as the camera.

    Change the Memory Options: RAM to at least 768 if you have a minimum of 4GB of system RAM. This will make the AVD load a bit faster.

    Leave the Memory Options: VM Heap: as is.

    Leave the Internal Storage: as is.

    Under SD card: I entered 128 MiB which should be sufficient for testing.

    To make the emulator perform even faster, enable GPU emulation by selecting the Use Host GPU under Emulation Options. You can also select Snapshot if you wish.

    The final screen will look like the one shown below. Then click on the OK button.

    AVD Manager data

    If there are no errors, you will see a screen like the one below. Press OK - the AVD list will then show the new AVD - MyJellyBean in this case (see figure).

    AVD Manager results

    New AVD created

  7. To start the AVD, first select it on the list, then click the Start button (see below).

    New AVD selected for starting

    A Launch Options window will pop-up (see below). You can set the display size and wipe the user data from here if you wish - then click on the Launch button. You will then see a Starting Android Emulator screen.

    AVD Launch Options

    Emulator start screen

    While the emulator is starting (may take time depending on the RAM size set and the speed of your system CPU and GPU), a thank-you window from Google may pop-up (see below) - if you wish you can agree to send usage statistic to Google - then click on Proceed to dismiss the window.

    Google thank-you

    The emulator loading screen with a flashing Android sign will be displayed (shown below).

    Android loading screen

    Once the emulator has finished loading, an initial screen will be displayed as shown below.

    Initial screen

    Click on the OK button and the main Home screen will appear (see below).

    Home screen

  8. To test the emulator On/Off button, click the power button on the right side (first row of buttons) to switch off and then click on it again to power on. The login screen will appear (see below) - slide (using the mouse) to unlock the device. The Home screen will appear (see below).

    MyJellyBean powered off

    MyJellyBean powered on - login screen

    Slide to unlock


    Home screen

  9. You can play with the emulator at this stage - close the main window when done. Then close the Starting Android Emulator screen. Close the Android SDK Manager window if you wish.

    Note that at the moment, you have start a terminal. change to the android-sdk-linux/tools/ directory and execute the ./android command every time you wish to start the Android SDK Manager. If you had implemented my tip about setting the PATH environment to point to the android executable, then all you have to do is open a terminal and execute the android command. It does seem to be a bit kludgey but it works. Is there an easier way? There are various suggestions on the Internet, found by using Google. If you are using the Unity interface and wish to place the Android SDK Manager launcher in the dock, I suggest the method outlined in the followthegeeks.com website (http://followthegeeks.com/how-to-manually-create-application-launcher-in-ubuntu-12-04-unity/). To reiterate the instructions:

    a) Open a terminal and execute:

      sudo gedit /usr/share/applications/AndroidSDK.desktop

    In the gedit editor window, copy and paste the following text:

    [Desktop Entry]
    Version=r21
    Type=Application
    Terminal=false
    StartupNotify=true
    Icon=/home/ridz1/Pictures/android-sdk-96.png
    Name=Android SDK
    Comment=Google Android SDK Manager
    Exec=/home/ridz1/android-sdk-linux/tools/android
    Categories=Application;Development;


    Change the items necessary for your system - for example, the location of the android executable (mine is /home/ridz1/android-sdk-linux/tools/android - yours may be different. Also make sure that the location of the icon for the Android SDK is valid. Save and close gedit.

    b) Now click on the Unity dash and enter android in the search box. The Android SDK will be displayed - click on the icon to start the program. The program will run and the Android icon will appear as an item in the dock. Right-click on that item and select Lock to Launcher. Viola! You now have a Unity dock with the Android SDK permanently present. The screen-shot below shows my Unity desktop in all its glory.

    My Unity desktop

    Thats it - you now have a working Android SDK and you are now almost ready to start developing Android software on your Ubuntu 12.04. The next blog will describe installing Eclipse - a programming environment for developing Java programs - and with the help of several Google plugins for Eclipse - a programming environment for developing Android programs as well.
Read full post »

Sunday, May 21, 2017

Apple iPhone SDK 3 2

Apple iPhone SDK 3 2


With this software you can develop applications that run on iPhone and iPod touch. Includes the Xcode IDE, Instruments, iPhone simulator, frameworks and samples, compilers, Shark analysis tool, and more.NOTE: In order to download this application, you need to log in with your Apple ID.

  1. Apple SDK_1 Free Download
  2. Apple SDK_2 Free Download
Read full post »

Saturday, May 20, 2017

Android SDK on Linux Mint 13 Maya

Android SDK on Linux Mint 13 Maya


In my previous blogs, I showed how to install various flavors of Java on Linux Mint 13 - both 32 and 64 bits versions. Now I will show how to install and configure the Google Android SDK to be used together with Java, for Android software development.

  1. First head over to:

      http://developer.android.com/sdk/index.html

    and download the latest (as of July 2012) file:

    android-sdk_r20-linux.tgz

    IMPORTANT NOTE:
    If you are using 64-bit Linux Mint 13 you MUST download and install the ia32-libs package since the Android SDK is a 32-bit application and requires the 32 bit library to operate properly. To download and install, open a terminal and execute:
       sudo apt-get install ia32-libs

  2. Start a terminal and unzip the downloaded file:

    tar xvf ~/Downloads/android-sdk_r20-linux.tgz

    This will create a new directory android-sdk-linux in your home directory containing all the unzipped files. Why the home directory? The simple answer is to avoid file permission problems. Note that by installing the SDK in the home directory, only the current user can access it - so security is guaranteed.

    If, however, you want the SDK to be accessed by other users, then you may have to install it somewhere else - perhaps the /opt directory. This article will not describe how to do that - it just assumes that the current user is the only one that can access the SDK.

  3. Change directory and execute the android SDK:

    cd android-sdk-linux/tools
    ./android

    TIP: You can set the PATH environment to point to your Android SDK tools directory so that you can start the android program anywhere. Edit the .profile file in your home directory and add the following lines to the end of the file:

      # set PATH so it includes users Android SDK if it exists
      if [ -d "$HOME/android-sdk-linux" ] ; then
          PATH="$HOME/android-sdk-linux:$HOME/android-sdk-linux/tools:$PATH"
      fi

    This will only take effect on the next logout/login or restart.

    The SDK Manager will start as shown in the screenshot below.


    Notice the progress bar at the bottom of the screen - this indicates that the SDK Manager is querying for updates from Google. Wait this is finished - you will then notice that it automatically selects a set of recommended packages. However it seems to have missed the Android SDK Platform-tools which, according to Google, is required when you install the SDK for the first time. So place a check mark on that item by clicking in the check-box. Also de-select the item Google APIs since this can only be downloaded and installed AFTER all the rest of the marked item has been installed. The final screen will look like the one shown below.


  4. Click on the Install 6 packages button - a window will pop up (shown below) listing all the packages to be installed. Notice that the Accept radio button is selected - so just press the Install button to start the process of downloading and installing the packages. The progress bar at the bottom indicates the status of this process. Also a log screen may appear if there are problems during install - ignore the Stopping ADB server failed (code -1) message if it appears on the log - this seems to be harmless.


    When install is complete, close the log windows (if open) and then place a tick mark on the Google APIs item and press the Install 1 package button. When the package list appears, press Accept, then the Install button, and then wait until this package is installed. Thats it - you have installed the recommended (and latest) Android packages necessary for software development. As of July 2012 this is Android 4.1(API 16) - codenamed Jelly Baby. Is it necessary to install all the other packages (API 3 to 15)? This is entirely up to you - if you really need to develop software only for an Android version, then, by all means download and install it using the SDK Manager.

  5. Now we need to set up at least one AVD (Android Virtual Device) on which you can test your developed software. The AVD is an emulator which emulates the ARM processor. To set up the AVD we need to invoke the AVD Manager which is part of the SDK Manager. Click on Tools (in the menu bar) and then click on the Manage AVDs... item. You will the screen as shown below.


  6. Click on the New button - a new window will pop-up (see below). Give the new AVD a name - for example MyJellyBaby. Select Android 4.1 - API Level 16 as the target for the AVD.

    Then enter the size of the SD card - I use 128 MiB which should be sufficient for testing. Leave the rest at default except for the Device ram size under hardware. To make the AVD load a bit faster and if you have at least 4GB of system RAM, change the size to 768 by clicking on the default 512 and changing it to 768.

    Next to make the emulator perform even faster, enable GPU emulation by clicking the New... button and then click on the double arrow on the Property: button and select GPU emulation from the list. Then click on the value item and change it to yes.

    The final screen will look like the one shown below. Then click on the Create AVD button.If there are no errors, you will see a screen like the one below. Press OK - the AVD list will then show the new AVD - MyJellyBaby in this case (see figure).


  7. To start the AVD, first select it on the list, then click the Start button - a window will pop-up (see below). You can set the display size and wipe the user data from here if you wish - then click on the Launch button. You will see a Starting Android Emulator screen (see below) and then the emulator will start loading as shown. Note the flashing Android sign while the emulator is loading.


  8. While the emulator is loading (may take time depending on the RAM size set and the speed of your system CPU and GPU), a thank-you windows from Google will pop-up (see below) - if you wish you can agree to send usage statistic to Google - then click on Proceed to dismiss the window.


    After a while the Android 4.1 JellyBaby emulator will appear (see below). The emulators screen is blank except for 3 notifications on the top right-hand screen. To start the emulator for the first time, click the power button on the right side (above the keyboard) to switch off and then click on it again to power on. The login screen will appear (see below) - slide (using the mouse) to unlock the device. The Home help screen will appear (see below) - click on OK on the help screen and the actual Home screen will be shown (see below).


  9. You can play with the emulator at this stage - close the main window when done. Then close the Starting Android Emulator screen. To dismiss the AVD list, press the Esc key and you will be beck at the Android SDK Manager window. Close it if you wish.
Thats it - you now have a working Android SDK and you are now almost ready to start developing Android software on your Linux Mint 13. The next blog will describe installing Eclipse - a programming environment for developing Java programs - and with the help of several Google plugins for Eclipse - a programming environment for developing Android programs as well.
Read full post »

Sunday, April 9, 2017

Android SDK on 64 bit Linux

Android SDK on 64 bit Linux


I commonly use adb and fastboot to access Android devices.  Ubuntu has packages for those tools making installation easy:
$ sudo apt-get install android-tools-adb android-tools-fastboot
But, in recent months, I have encountered instances where the adb and fastboot binaries in the Ubuntu repository are out of date for the device with which I am attempting to connect.
$ apt-cache show android-tools-adb
Package: android-tools-adb
Priority: extra
Section: universe/devel
Installed-Size: 227
Maintainer: Ubuntu Developers
Original-Maintainer: Laszlo Boszormenyi (GCS)
Architecture: amd64
Source: android-tools
Version: 4.2.2+git20130218-3ubuntu41
Depends: libc6 (>= 2.15), libssl1.0.0 (>= 1.0.0), zlib1g (>= 1:1.1.4)
Filename: pool/universe/a/android-tools/android-tools-adb_4.2.2+git20130218-3ubuntu41_amd64.deb
...

$ adb version
Android Debug Bridge version 1.0.31

Android Software Development Kit


There is another way to install adb: the Android Software Development kit.  There is an issue, though.  The development kit software is 32-bit, and modern computer systems run 64-bit operating systems.  So, one needs a way to install 32-bit libraries in 64-bit Linux to support 32-bit applications.

The Android SDK can be found here. However, before you start downloading the Android Studio displayed prominently at the top of the page, consider that Studio is large collection of software for developing Android applications.  Forensically speaking, it is overkill, and fortunately, there is an alternative download that servers our purpose better: SDK Tools Only.

I prefer to install tools not found in the Ubuntu repository in the /opt directory.  After I download the SDK, I decompress the archive:
$ sudo tar xf Downloads/android-sdk_r24.3.4-linux.tgz -C /opt
The next step in installation is to execute the Android SDK Manager.  Note: You will need java installed (java-common package) to run the application.
$ /opt/android-sdk-linux/tools/android 
The only component needed to successfully run adb and fastboot are the Android SDK tools (already installed) and Android SDK Platform-tools.  Check the later and go through the installation process.  Exit the manager when you are done.

Installing 32-bit Support in 64-bit Ubuntu


The adb and fastboot executable binaries are located in the platform-tools folder of the SDK.  However, if you try to execute the tools, you will get and error stating the that the command is not found, even though you see the tools in the directory, with proper permissions for execution, too! 
$ cd /opt/android-sdk-linux/platform-tools
$ ./adb version
bash: ./adb: No such file or directory
$ ls -l adb
-rwxr-xr-x 1 root root 1221540 Aug 25 13:05 adb
Confusing?  You bet. The issue is that you are trying to execute a 32-bit application in a 64-bit-only operating system.  There is no 32-bit support installed in Ubuntu by default.  But we can solve that:
$ sudo dpkg --add-architecture i386
$ sudo apt-get update
The specific libraries to support the SDK are installed as follows:
$ sudo apt-get install libc6:i386 libncurses5:i386 libstdc++6:i386
$ ./adb version
Android Debug Bridge version 1.0.32
Revision 57224c5cff69-android
And, voila!  The latest SDK binary tools installed.

Easy Access


There are two simple ways to gain access to the SDK platform tools: link files or path modification.  Link files are placed in a location that is part of your system path already, and path modification places the platform tools directory in your path.  Which is best?  Welcome to freedom, friend, its your choice.

Link files

Link files are found in all modern operating systems, so I wont bother explaining them.  First, you need to know what directories are in your path so you know where to put the links:
$ echo $PATH
/usr/local/sbin:/usr/local/bin:/usr/sbin:/usr/bin:/sbin:/bin:/usr/games:/usr/local/games
Most packages you install place their executable binaries in /usr/bin and /usr/sbin, depending on the need for administrative privileges.  Most software built and installed by the user are placed in the /usr/local/bin and /usr/locals/sbin folders.  Since we are installing the software, and it does not require admin rights to execute, /usr/local/bin is a good choice.

To create link files in Linux (symlinks are preferred for this type of operation), do the following:
$ ln -s /opt/android-sdk-linux/platform-tools/adb /usr/local/bin
$ ln -s /opt/android-sdk-linux/platform-tools/fastboot /usr/local/bin
Note: you will have a lot more success with link files if you get in the habit of using absolute paths.  There is a place for relative paths, but this is not it.

Modifying the PATH

The PATH system variable maintains the list of directories searched by the system for commands.  When you, as a user, type a command without its full path, the list of directories in the PATH variable are queried for the command.  If the command is not located, an error results.  To place the adb and fastboot binaries into the path, we need to add the folder containing them to the PATH variable.

It is possible to modify the path, both temporarily and permanently.  For example:
$ echo $PATH
/usr/local/sbin:/usr/local/bin:/usr/sbin:/usr/bin:/sbin:/bin:/usr/games:/usr/local/games
$ which
$ PATH=/opt/android-sdk-linux/platform-tools

$ echo $PATH
/opt/android-sdk-linux/platform-tools$ which
Command which is available in the following places
 * /bin/which
 * /usr/bin/which
The command could not be located because /bin:/usr/bin is not included in the PATH environment variable.
which: command not found
The problem about illustrates that we have to be careful setting the path.  By setting the path to /opt/android-sdk-linux/platform-tools, we removed the directories previously stored there.  The method used, however, is only a temporary change to the PATH variable.  The path can be reset by restarting the terminal window, or by resetting the PATH variable to its original contents:
$ PATH=/usr/local/sbin:/usr/local/bin:/usr/sbin:/usr/bin:/sbin:/bin:/usr/games:/usr/local/games
To make the change permanent, and to append to but not replace the contents of the PATH variable, we should add the following to our ~/.bashrc file (if your installation does not have the file, create it):
export PATH="$PATH:/opt/android-sdk-linux/platform-tools"
It is not necessary to have quotes in the statement above if there are no spaces in the path, but it is the safest way to execute the statement.  By placing this statement in .bashrc, the PATH variable will be expanded, have the platform-tools folder appended, and then the value will be reassigned to the PATH variable.  This will happen each time a new terminal session starts.


Read full post »
 

Copyright © Video game tester Design by Free CSS Templates | Blogger Theme by BTDesigner | Powered by Blogger